Streamline Python Model Deployment and Integration with IBM Db2
Are you looking for a simple solution to deploy your Python machine learning model and integrate it with other applications? IBM Db2 can help you with that. You can easily deploy your trained Python model on a secure Db2 server using a Python user-defined function. This allows you to generate predictions effortlessly with SQL queries. By deploying Python models on Db2, you can avoid moving extensive data, reduce security risks, and simplify application development. You can make predictions directly inside Db2 using simple SQL queries. In this tutorial, I will guide you through the process of building a Python model using data from a Db2 database and deploying it on the Db2 server. Finally, I will show how to write SQL queries to generate predictions from this model using Db2 data. You can adapt this tutorial to your own AI use cases.
(The code for this tutorial is available from this GitHub link. )
The Problem and Db2's Solution
To build furniture, raw wood cut from a tree is not enough. You need machinery to cut the wood into fine pieces with specific measurements. Similarly, raw data stored in a relational database management system is not very useful on its own. You need to process it with machinery to convert it into insights. Python is a powerful tool for transforming raw data into refined features and building intelligent AI models. Typically, data from a relational store is duplicated onto Python platforms for processing and model creation. However, this transfer of data between systems during training and inference can create complexities and raise concerns about cost, latency, security, and data processing logic. IBM Db2 offers a simpler solution for developing and deploying Python models with data stored in a Db2 database. It provides tools for easy data retrieval from Db2 to Python. After training a Python model, users can conveniently deploy it on the database using a Python user-defined function.
The Tutorial
In this tutorial, I will develop a classification model with scikit-learn using data from a Db2 database.
The dataset I will use contains historical flight information in the US. Each row in the training dataset provides details about a flight, including the destination airport, origin airport, flight time, delay time, and whether the flight arrived on time or was delayed. Using this flight information, I will train a classification model to predict whether a flight will arrive on time or be delayed. This is a binary classification task, as the model will classify each flight as either on time or delayed, producing a binary outcome.
I will load the training dataset from a Db2 database table into a Python Jupyter notebook. After exploring the dataset, I will preprocess the data to transform raw input features into a final feature set. Next, I will create a machine learning pipeline using scikit-learn with a logistic regression algorithm. I will train this pipeline using the training dataset and evaluate the model’s quality. Finally, I will deploy the trained model on Db2 using a Python User-Defined Function and generate predictions from the deployed model via SQL.
All these steps are contained within a single notebook. You will see the end-to-end workflow of data loading, data transformation, model training, model evaluation, and model inferencing and deployment within the single notebook.
Db2 Setup
In order to use the Python UDF feature at Db2, you'll need to complete the following 3 steps:
- Install Python 3.x on the Db2 system (Linux platform only). For the installation steps for Python on a Linux system, the following document might be helpful.
Building and Installing Python 3.12.3 on Red Hat Enterprise Linux 9.2
- After installing Python, install the Python packages, with compatible versions, that your Python model pipeline will use.
- Set PYTHON_PATH in Db2 to the directory of the Python executable. e.g.,
db2 update dbm cfg using python_path /usr/bin/python3
Ensure that Db2 fenced user ID has execution permission to the Python executable.
- You'll find here the instructions and data for setting up the Db2 tables for this tutorial. In the database,
flights_trainandflights_testtables have the training and test datasets, respectively, for the ML model I will create.
Python Dev Environment
I have developed this tutorial project using Visual Studio Code IDE. In order to simplify deployment of the UDF assets on Db2, I used remote explorer option of Visual Studio Code. Remote explorer option allowed me to make a remote connection to my home directory, for my userid on the Db2 server, and create a Python project on the same system as Db2's. In case you're not familiar with remote development using Visual Studio, you can check out this page: Remote Development using SSH
Also, in the code repository for this tutorial, I have shared the steps for creating and setting up the Python project for this tutorial. Here is the link to these steps.
Project Directory
Let's look at the project's main components from here.
db2con.envcontains Db2 connection information. I will use this file to connect to my Db2 database. Update this file with connection information for your Db2 database.pythonudf-demo.ipynbnotebook has the complete pipeline for building the model, deploying it on Db2, and generating predictions from the deployed model.
In the rest of this tutorial, I will step you through the sections of the pythonudf-demo.ipynb notebook.
Step 1: Import Required Python Libraries
Here's the list of Python libraries and functions I will use in this tutorial.
import pandas as pd
from sklearn.compose import ColumnTransformer, make_column_selector, make_column_transformer
from sklearn.pipeline import make_pipeline
from sklearn.preprocessing import MaxAbsScaler
from sklearn.preprocessing import OneHotEncoder
from sklearn.impute import SimpleImputer
import numpy as np
from joblib import dump
from sklearn.linear_model import LogisticRegression
from sklearn import set_config
import pandas as pd
from dotenv import dotenv_values
Step 2: Enabling Db2 Magic Commands Extension for Jupyter Notebook
I will use Db2 Magic commands to interact with Db2 directly from the notebook. Db2 Magic Commands is Db2's extension for Jupyter Notebook. It provides a convenient way to embed and execute clean SQL statements directly within a Python notebook. Behind the scene, Db2 Magic Commands append additional Python code for interacting with Db2, running SQL, and presenting results from Db2 to the Notebook. Following lines of code download the Db2 Magic Commands extension and enable this extension on the Notebook.
# Download and enable Db2 magic commands extension for Jupyter Notebook
!wget https://raw.githubusercontent.com/IBM/db2-jupyter/master/db2.ipynb
%run db2.ipynb
Db2 Extensions Loaded.
The above message confirms that the Db2 Magic Commands is successfully enabled.
Step 3: Loading Training Dataset from Db2
Using Db2 credentials from the db2con.env file, I will now connect to my Db2 database using the following code.
db2creds = dotenv_values('db2con.env')
%sql CONNECT CREDENTIALS db2creds
Connection successful. db2ml @ localhost
The above message confirms that the database connection was successful.
Now, I will bring the train data from the FLIGHTS_TRAIN table in Db2 to my Notebook. Db2 Magic Commands will automatically create a Pandas dataframe with the content of the FLIGHTS_TRAIN table. After loading the dataset, I printed its shape - the number of rows and columns, and 5 sample rows.
query = %sql SELECT * FROM FLIGHTS_TRAIN
df = pd.DataFrame(query)
cols_show = ['MONTH','DAYOFWEEK', 'UNIQUECARRIER', 'ORIGIN', 'DEST', 'DEPDELAY', 'FLIGHTSTATUS']
print('shape of the dataset: ', df.shape)
print('sample rows from the dataset:')
df[cols_show].sample(5)
Output:
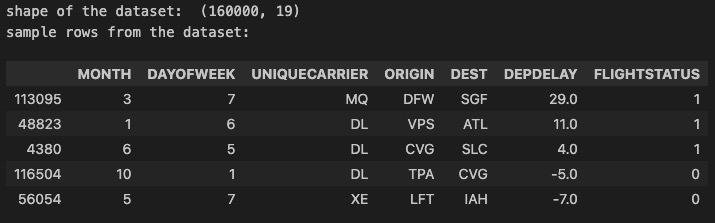
From the above output, you can see that the dataframe, holding content of FLIGHTS_TRAIN table in Db2, has 16000 rows and 19 columns. Also, you can see the 5 sample rows with subset of their columns.
Step 4: Split the dataset into Train and Test Partitions
I will make 2 partitions in the training dataframe: 80% of the samples for model training and 20% for model evaluation. I will also separate the feature columns from the target column: X dataframe will have only the feature values, where y will have the target/label values.
# Randomly split the dataset into 2 datasets: train and test sets. The test set has 20% of the original samples.
# The remaining 80% of the samples remain with the train set.
df_test = df.sample(frac=0.20)
df_train = df.drop(df_test.index)
# select the subset of columns as the input features for the ML model
input_cols = ['YEAR','QUARTER', 'MONTH',
'DAYOFMONTH', 'DAYOFWEEK','UNIQUECARRIER',
'ORIGIN', 'DEST', 'CRSDEPTIME',
'DEPDELAY', 'DEPDEL15','TAXIOUT','WHEELSOFF',
'CRSARRTIME', 'CRSELAPSEDTIME', 'AIRTIME', 'DISTANCEGROUP']
# select the class label, the target column, for the classification model
target = ['FLIGHTSTATUS']
X = df_train[input_cols]
y = df_train[target].astype('int')
5. Define the ML Pipeline
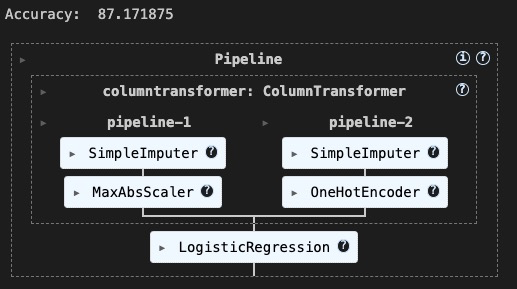
In the code block below, I will define various data preprocessing steps. These steps will handle missing values and standardize numeric values. I will select logistic regression as the classification algorithm. To combine and sequence these steps, I will create a scikit-learn pipeline. I have added comments to the code to explain each part’s purpose. I recommend reading the comments to understand their actions.
# define the strategy to fill in missing values in the numeric columns
num_pipeline = make_pipeline(SimpleImputer(strategy='constant', fill_value=0),
MaxAbsScaler())
# define the strategy to fill in missing values in the categorical columns
cat_pipeline = make_pipeline(SimpleImputer(strategy='most_frequent'),
OneHotEncoder(handle_unknown='ignore'))
# combine the previous 2 pipelines into a data preproessing pipeline.
preprocessing = make_column_transformer(
(num_pipeline, make_column_selector(dtype_include=np.number)),
(cat_pipeline, make_column_selector(dtype_include='object'))
)
# create a final pipeline by chaining data preprocessing and a learning algorithm, `LogisticRegression`
pipe_lr = make_pipeline(preprocessing,
LogisticRegression(random_state=1,
solver='lbfgs'))
6. Train and Evaluate the Model
Using the ML pipeline I defined in step 4, I will now train a model using the training examples: training features, X, and training labels, y. After training the model, the following code also evaluate the model by computing its predication accuracy on the test examples that I set aside in step 4. In this code block you can compute other evaluation metrics, such as recall and precision. To learn more about computing other performance metrics for a scikit-learn model, check out this link.
# train the model using the training set features and class labels
pipe_lr.fit(X, y)
# evaluate the trained model using the test set
X_test = df_test[input_cols]
y_test = df_test[target].astype('int')
predictions = pipe_lr.predict(X_test)
# compute the print the model accuracy
print('Accuracy: ', pipe_lr.score(X_test, y_test) * 100)
# retrain the model using the complete dataset
pipe_lr.fit(df[input_cols], df[target].astype('int'))
Output:
The trained pipeline remains in memory as a scikit-learn pipeline object.
7. Export the Trained Pipeline (Model)
Now, I will export the trained pipeline from Python's memory to a file on the disk so that I can copy this to the Db2 cluster. The process of copying an in-memory object to the file system is called serializing. For serializing the pipeline, I will use dump function from the joblib library. The following code will save the pipeline into a file on disk with name myudf_lr.joblib.
# Export the model
dump(model, 'myudf_lr.joblib')
Output:
['myudf_lr.joblib']
Next, I will copy this file to directory on the Db2 cluster. In this example, I have copied this to my home directory as follows:
/home/shaikhq/pipe_lr/myudf_lr.joblib
8. Define a Python User-Defined Function for in-db Inferencing with the Model
The code block below contains the definition of a Python User-Defined Function (UDF) for using the Python model exported earlier with Db2. This UDF allows batch inferencing and generates predictions for a batch of input rows. When executing this UDF, it will generate a batch as a pandas dataframe that includes all the input rows. It will then send this dataframe as input to the trained model pipeline for generating predictions. Once the model generates predictions, the UDF will return the results to the user. These results will include the input features and the predictions from the model.
The UDF includes the model file path and the list of model features. These details are required for loading the model from the disk to memory and mapping the input columns to the model features.
import nzae
import pandas as pd
from joblib import load
ml_model_path = '/home/shaikhq/pipe_lr/myudf_lr.joblib'
ml_model_features = ['YEAR', 'QUARTER', 'MONTH', 'DAYOFMONTH', 'DAYOFWEEK', 'UNIQUECARRIER', 'ORIGIN', 'DEST', 'CRSDEPTIME', 'DEPDELAY', 'DEPDEL15', 'TAXIOUT', 'WHEELSOFF', 'CRSARRTIME', 'CRSELAPSEDTIME', 'AIRTIME', 'DISTANCEGROUP']
class full_pipeline(nzae.Ae):
def _runUdtf(self):
# Load the trained pipeline
trained_pipeline = load(ml_model_path)
# Collect rows into a single batch
rownum = 0
row_list = []
for row in self:
if rownum == 0:
# Grab batch size from first element value (select count(*))
batchsize = row[0]
# Collect everything but the first element (which is select count(*))
row_list.append(row[1:])
rownum += 1
if rownum == batchsize:
# Collect data into a Pandas dataframe for scoring
data = pd.DataFrame(row_list, columns=ml_model_features)
# Call our trained pipeline to transform the data and make predictions
predictions = trained_pipeline.predict(data)
# Output the columns along with the corresponding prediction
for x in range(predictions.shape[0]):
outputs = row_list[x] + [int(predictions[x]) if predictions.dtype.kind == 'i' else float(predictions[x])]
self.output(outputs)
# Reset rownum and row_list for the next batch
row_list = []
rownum = 0
self.done()
full_pipeline.run()
The UDF definition needs to be saved in a .py file. I am saving this UDF to myudf_lr.py and copying this file to the following path on the Db2 server.
/home/shaikhq/db2-pythonudf-tutorial/myudf_lr.py
9. Register the UDF on Db2
Then, I’ll proceed with registering this Python UDF on Db2. Once I register this UDF by running the following SQL, I can use it in SQL queries for generating predictions. When one invokes this UDF function, the function will load and use the Python model I created earlier. Keep these points in mind when looking at this SQL statement:
- I named it MYUDF_LR.
- I’ve listed the Python model features’ Db2 datatypes in the function’s parameter list.
- SQL declares the return value of the function after it completes execution. The function will output a TABLE object containing all the input columns. The return TABLE will also have a new column called “FLIGHTSTATUS_PREDICTION” displaying the prediction from the python model.
- The SQL’s final section contains the path to the python script defining the UDF: EXTERNAL NAME ‘/home/shaikhq/db2-pythonudf-tutorial/myudf_lr.py’.
%%sql
CREATE OR REPLACE FUNCTION MYUDF_LR(
INTEGER,
INTEGER,
INTEGER,
INTEGER,
INTEGER,
INTEGER,
VARCHAR(50),
VARCHAR(50),
VARCHAR(50),
INTEGER,
REAL,
REAL,
INTEGER,
INTEGER,
INTEGER,
INTEGER,
INTEGER,
INTEGER
)
RETURNS TABLE (
"YEAR" INTEGER,
"QUARTER" INTEGER,
"MONTH" INTEGER,
"DAYOFMONTH" INTEGER,
"DAYOFWEEK" INTEGER,
"UNIQUECARRIER" VARCHAR(50),
"ORIGIN" VARCHAR(50),
"DEST" VARCHAR(50),
"CRSDEPTIME" INTEGER,
"DEPDELAY" REAL,
"DEPDEL15" REAL,
"TAXIOUT" INTEGER,
"WHEELSOFF" INTEGER,
"CRSARRTIME" INTEGER,
"CRSELAPSEDTIME" INTEGER,
"AIRTIME" INTEGER,
"DISTANCEGROUP" INTEGER,
"FLIGHTSTATUS_PREDICTION" INTEGER
)
LANGUAGE PYTHON
PARAMETER STYLE NPSGENERIC
FENCED
NOT THREADSAFE
NO FINAL CALL
DISALLOW PARALLEL
NO DBINFO
DETERMINISTIC
NO EXTERNAL ACTION
CALLED ON NULL INPUT
NO SQL
EXTERNAL NAME '/home/shaikhq/db2-pythonudf-tutorial/myudf_lr.py'
At this point, I have copied the Python model pipeline file and Python UDF definition file to the Db2 server. I have also register this new UDF at Db2. Now I can use this UDF with a new table of inference input rows for generating predictions with the Python model.
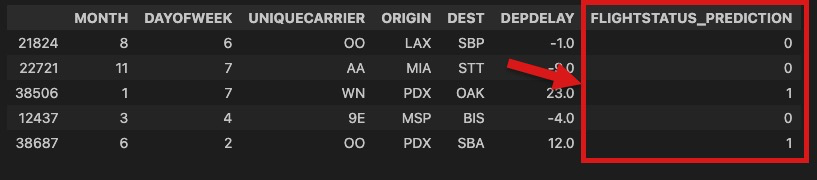
10. Generate Predictions with the Deployed Python Model via Db2 SQL
I will use the following SQL statement to generate predictions from the Python model deployed on Db2. To make predictions, I will input rows from the FLIGHTS_TEST table into the model. The datatypes in the table match those in the training dataset, FLIGHTS_TRAIN, which was used for model training. However, these rows do not exist in the TRAINING table. According to the UDF definition, the initial parameter for the UDF is the row count in the test table, which assists the UDF in determining the number of rows in the input batch. The UDF uses this count value to loop through the input rows and create a dataframe of all rows for batch prediction request to the python model. The remaining input to the MYUDF_LR is the list of datatypes of the feature columns for the Python model.
sql = f"""
SELECT f.*
FROM FLIGHTS_TEST i,
TABLE(
MYUDF_LR(
(SELECT COUNT(*) FROM FLIGHTS_TEST),
i."YEAR",
i."QUARTER",
i."MONTH",
i."DAYOFMONTH",
i."DAYOFWEEK",
i."UNIQUECARRIER",
i."ORIGIN",
i."DEST",
i."CRSDEPTIME",
i."DEPDELAY",
i."DEPDEL15",
i."TAXIOUT",
i."WHEELSOFF",
i."CRSARRTIME",
i."CRSELAPSEDTIME",
i."AIRTIME",
i."DISTANCEGROUP"
)
) f
"""
# choose a subset of the columns to display
cols_show = ['MONTH','DAYOFWEEK', 'UNIQUECARRIER', 'ORIGIN', 'DEST', 'DEPDELAY', 'FLIGHTSTATUS_PREDICTION']
df_test_predictions = %sql {sql}
df_test_predictions[cols_show].sample(5)
After running the above block of code, I got back the following results from Db2, including flight status predictions from the Python model deployed on Db2.
Conclusion
In summary, there are many benefits to integrating machine learning models directly within your database environment using the Python UDF feature in IBM Db2. This integration can improve the efficiency and simplicity of your data processing workflows. It eliminates the need for extensive data movement, reduces security risks, and simplifies application development. It simplifies making predictions through simple SQL queries. By following the steps outlined in this tutorial, you can seamlessly deploy and use Python models with the power of Db2. This integration ensures secure and efficient data processing and model inferencing. Ultimately, this integration sets the stage for more streamlined and robust AI solutions, leading to better decision-making and improved business outcomes.
Shaikh Quader is the AI architect of IBM Db2, where he develops features to enhance database operations with machine learning and facilitate the deployment of ML models within the database. In his role, Shaikh manages research collaborations between IBM and a few Canadian universities. He and his team have created multiple Python frameworks aimed at optimizing complex data science tasks, including the exploration of high-dimensional datasets and the improvement of data quality. Shaikh has over 12 scientific publications and many issued and filed patents on AI. He holds a master's degree from the University of Waterloo and is currently pursuing a Ph.D. in machine learning at York University. He can be reached at shaikhq@ca.ibm.com. You can find Shaikh's LinkedIn profile here.